How to Build a Dental Portfolio: Examples, Associateship Guide & Free Template
A definitive clinical guide for dentists building case galleries for practice growth, associates preparing high-impact hiring portfolios, and specialty residents documenting complex cases in restorative dentistry, periodontics, and prosthodontics.
Published July 20, 2026 · Updated September 7, 2026
Quick Answer
A strong dental portfolio combines carefully selected cases, consistent clinical photography, clear before-during-after presentation, and written patient consent. Prioritize quality over quantity: document aesthetic, implant, periodontal, restorative, and prosthodontic work with matching views and lighting; organize cases for reliable retrieval; and store originals in a HIPAA-ready system. Practices use that archive to support patient communication; associates use it for hiring reviews; specialty residents use the same documentation standards to prepare case presentations for program completion and board review.
What a Strong Dental Portfolio Includes
Think of a dental portfolio as a curated case library, not a dump of every photo on your phone. Whether the audience is a patient comparing smile options or a residency director reviewing applicants, they need the same foundation: honest documentation, repeatable photography, and enough context to understand what you did and why.
Most effective portfolios share these building blocks:
- • Matched before-and-after sets — same views, framing, and lighting so the change is visible without explanation
- • Core clinical views — frontal smile, retracted frontals, laterals, and occlusals as appropriate for the procedure
- • Brief case notes — procedure type, key steps, materials, and any constraints (occlusion, gingival display, shade matching)
- • Consent-backed marketing assets — a shareable subset approved for website, social, or applications
- • Organized storage — patient-linked originals you can retrieve in seconds during a consult or interview prep
Dual audiences diverge in tone, not in substance. Patients respond to clear visual stories. Hiring committees respond to consistency and clinical reasoning. Build one disciplined library, then package two presentations from it.
Case Selection
Quality over quantity is the rule that protects credibility. Twelve excellent cases outperform forty uneven ones. Select work that shows range across the services you want to be known for—typically veneers and smile design, implants and implant-supported restorations, orthodontics or clear aligners, and everyday restorative excellence (crowns, bridges, composites).
Veneers and smile design
Include cases with different starting points: discoloration, spacing, worn edges, and mild crowding. Show retracted and full-smile views so color, shape, and soft-tissue harmony are all visible.
Implants
Favor cases with clear site documentation, provisional stages when relevant, and final emergence profile. Single-tooth anterior implants and multi-unit posterior cases both help demonstrate planning, not only the final crown.
Ortho and aligners
Progress series matter more than a single finish photo. Capture consistent intervals so reviewers can see mid-treatment decisions, not only the endpoint.
Restorative
Everyday excellence sells trust. Well-matched crowns, natural composite contouring, and careful occlusion photos show that you deliver predictable results beyond elective cosmetics.
Skip cases with incomplete photography, mismatched angles, or unclear outcomes. Include a few challenging starts—patients and hiring doctors notice when every case begins as an easy win.
Dental Portfolio Examples: Restorative, Periodontics & Orthodontics
Reviewers—whether prospective associateship directors, specialty board examiners, or high-aesthetic patients—evaluate clinical portfolios across three primary disciplines. Below are benchmark case presentation sequences demonstrating standard-setting photography, intraoperative clarity, and long-term tissue stability.
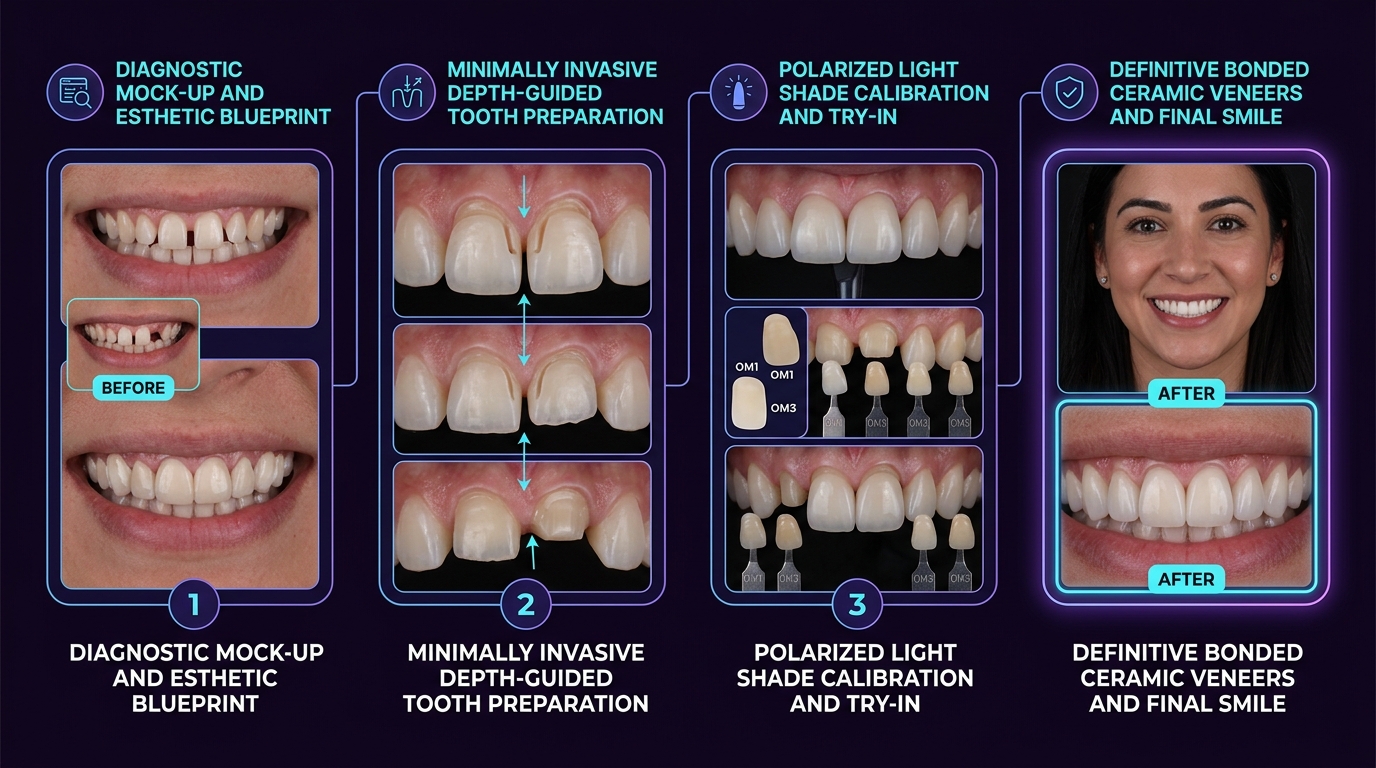
Minimally Invasive Smile Reconstruction Matrix
Aesthetic restorative cases must prove conservation of tooth structure and precise shade calibration. Rather than showing only an edited glamour after-photo, a complete restorative dossier reveals the clinical decision making behind the result:
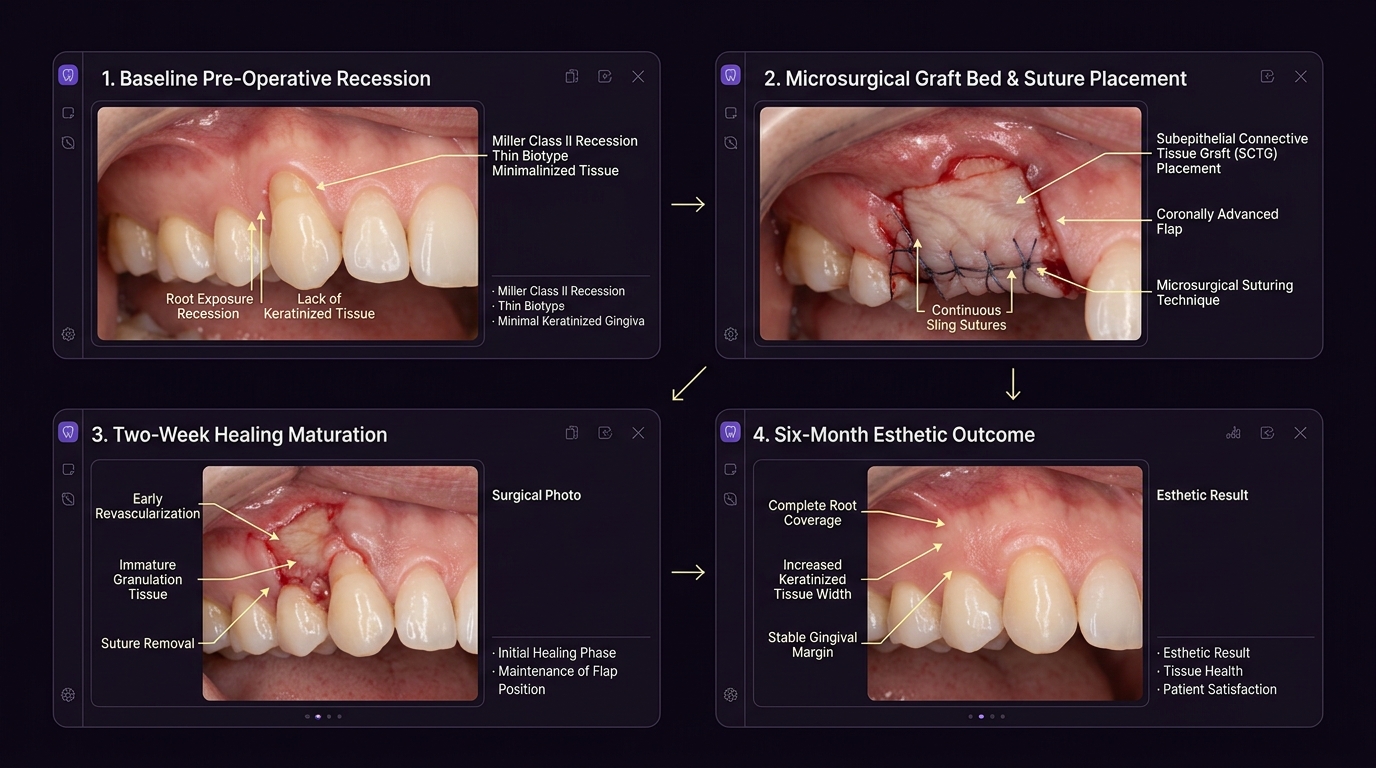
Connective Tissue Graft (SCTG) Surgical Progression Series
In surgical and periodontal portfolios, tissue handling, vascularization, and suture hygiene matter more than the final smile line alone. Documenting critical surgical milestones validates biological understanding and microsurgical execution:
Interval-Based Aligner & Functional Occlusion Tracking
Orthodontic portfolios require longitudinal consistency. Rather than a single start and finish shot, reviewers look for interval tracking:
- • Interval series (T0, T3, T6, Finish): Matched 1:2 retracted lateral and frontal views tracking space closure, overjet reduction, and transverse expansion.
- • Occlusal mirror views: Standardized upper and lower arch photos showing arch form coordination and torque expression without mirror fog.
- • Articulating paper marks: Pre- and post-treatment photographic records of bilateral contacts in centric relation and absence of posterior interferences during protrusion.
- • Retention verification: Fixed lingual wire or clear overlay retainer delivery photos confirming long-term alignment stability.
The Gold Standard: AACD 12-View Photographic Series
To ensure clinical credibility across restorative, surgical, and cosmetic case presentations, incorporate the American Academy of Cosmetic Dentistry (AACD) 12-view photographic protocol into your practice routine:
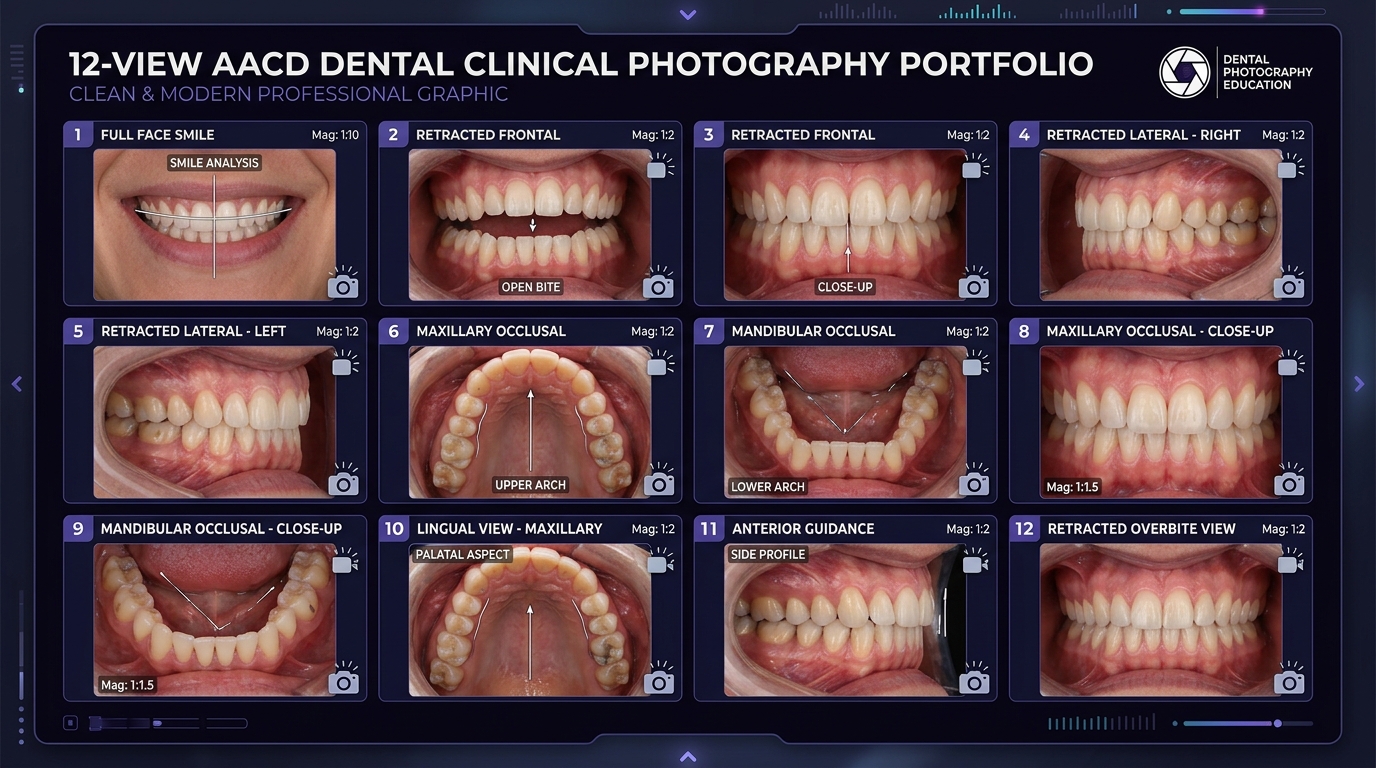
Maintaining these identical 12 views between pre-operative records, mock-up evaluation, and final delivery enables instant, unquestioned clinical comparison that impresses interviewers and patients alike.
* Illustrative case simulation generated for educational workflow standards. Clinical cases in Esthetix are securely documented with verified patient authorizations.
Photography Standards for Portfolio Cases
Portfolio photos fail for predictable reasons: inconsistent camera distance, mixed white balance, uneven flash, or missing counterparts for before-and-after pairs. Set a simple chairside protocol and stick to it for every case you might later publish or present.
Minimum consistent views
- • Full-face smile (when consent allows facial images)
- • Retracted frontal in occlusion
- • Left and right laterals
- • Upper and lower occlusals when the procedure affects those surfaces
- • Close-ups of the treated region at the same magnification before and after
Use the same lighting setup and camera settings whenever possible. Soft, even illumination and a neutral background reduce distractions. If you shoot with a phone, use a dedicated clinical app or workflow that keeps photos out of the personal camera roll and into organized case storage.
Consent belongs in the photography workflow, not as an afterthought. Capture written authorization for clinical use and, separately, for marketing or professional portfolio use. A clear dental photo consent form helps patients understand how images may be shared and helps your team stay consistent.
Once photos are captured, organize them immediately by patient, date, and procedure so portfolio curation does not become a weekend archaeology project. See how to organize dental patient photos for folder structure, tagging, and retrieval habits that scale.
Before-and-After Presentation
Before-and-after pairs are the heart of a dental portfolio. Side-by-side or slider layouts make outcomes understandable in seconds. Keep framing identical, crop consistently, and avoid heavy filters that change tooth shade or soft-tissue color. Patients should see what treatment actually looked like—not a stylized version.
For chairside consults, present cases that resemble the patient's starting condition. Relevance builds confidence faster than a highlight reel of unrelated smile makeovers. For websites and social posts, lead with one strong pair, add a short plain-language caption, and link to more examples by procedure.
For a deeper look at why visual documentation supports communication and case discussions, read why before-and-after dental photos matter.
Organizing Your Portfolio for Practice Marketing
Practice marketing portfolios exist to help prospective patients answer one question: "Can this office deliver the result I want?" Structure your public gallery around procedures patients search for—veneers, whitening and smile design, implants, Invisalign or braces, and full-mouth rehab—rather than internal billing codes.
- • Group by treatment type so website visitors can filter to relevant examples
- • Keep a marketing-approved subset separate from the full clinical archive
- • Standardize captions with procedure name and a one-sentence outcome description
- • Refresh quarterly so galleries reflect current materials and techniques
- • Reuse the same cases across website, consult room displays, and social—with consent scopes that match each channel
The practices that look most professional online usually are not taking more photos—they are retrieving and presenting the right ones faster. A clean case library turns every consult into a chance to show proof, not a scramble through camera rolls.
Clinical Documentation for Specialty Residency Programs
In many specialty programs—particularly periodontics, restorative dentistry, and prosthodontics—clinical photography is part of formal training requirements. Residents assemble documented cases for faculty review, program completion presentations, and, in some pathways, board or credentialing submissions. Delaying organization until the final year makes it difficult to reconstruct complete, consistent case records from strong clinical work.
Capture each qualifying case as a structured sequence from the first appointment: diagnostic photographs, key intraoperative or laboratory stages, and final outcomes with matching views. Organize by the procedure categories your program emphasizes so a complete series is available when presentations are due.
Periodontics
Soft-tissue and implant cases documented with consistent retraction, lighting, and healing-interval follow-up so comparative views remain credible under faculty review.
Restorative dentistry
Preparation, provisional, and definitive views for direct and indirect restorations, captured at matching angles so shade, contour, and occlusal decisions are clearly visible.
Prosthodontics
Multi-visit sequences—from diagnostic records through delivery—maintained as a single case so complex rehabilitations remain coherent across the full course of treatment.
- • Follow program requirements first — required case counts, view standards, and presentation formats take precedence over general portfolio guidance
- • Document treatment stages, not only final results — faculty assess clinical judgment and sequencing as carefully as the completed outcome
- • Maintain one primary archive — then export curated subsets for program presentations, board materials, and later associateship applications
- • Address consent early — educational and presentation use often requires clearer authorization than chart documentation alone
Begin structured documentation at the start of training. Faculty feedback is most useful while there is still time to improve photographic and organizational habits before final case presentations.
How to Make a Dental Portfolio for Associateship Applications
When applying for competitive private practice associateships, boutique cosmetic practices, or high-production DSO partnerships, your clinical portfolio carries vastly more weight than a standard resume. Practice owners and clinical directors evaluate your hand skills, diagnostic clarity, and ethical boundaries.
1. Curate the 60/40 Case Ratio
A common mistake among recent grads is submitting ten full-mouth veneer cases. Hiring dentists are not hiring you to do full-mouth cosmetic rehabs on day one. They need to know you can reliably produce high-quality everyday dentistry:
- • 60% Everyday Predictability: High-quality Class II composites with tight contact points, single-unit posterior crowns (with visible margins and occlusion), endodontic obturations, and surgical extractions with ridge preservation.
- • 40% Comprehensive Vision: Anterior cosmetic restorations, quadrant rehabs, clear aligner progressions, and single-unit anterior implant crowns showing emergence profile.
2. Absolute HIPAA Anonymization
Never walk into an interview with un-redacted patient records or personal camera roll photos. Demonstrate compliance maturity:
- • Remove all direct identifiers (patient name, chart MRN, date of birth, date of treatment).
- • Crop or withhold full-face views unless explicit written marketing/professional authorization is on file.
- • Use clinical descriptors instead: "Female, 34 years old, healthy baseline, chief complaint of fractured incisal edge #8."
3. Show Process Over Final Glitz
Hiring principals scrutinize how you handle intermediate steps. Include intraoperative stages:
- • Rubber dam isolation: Demonstrates commitment to moisture control, bonding longevity, and airway safety.
- • Margin refinement: Clear finish lines on crown preparations before impression or digital scanning.
- • Temporization: High-quality provisionals showing respect for soft tissue contour and emergent papillae during lab fabrication.
4. Self-Critique & Complications
Include at least one case that encountered a clinical complication (e.g., unexpected bleeding, tight interproximal contact, slight shade modification needed) and explain how you resolved it. Senior clinicians value self-awareness, humility, and problem-solving far above perceived perfection.
Free Dental Portfolio Template & Case Outline
Use this standardized 6-slide case outline for your associateship dossier, residency presentations, or study club submissions. It organizes your diagnostic rationale, photographic series, procedural protocol, and occlusal follow-up into a coherent clinical narrative:
HIPAA and Consent When Sharing Cases
Clinical photographs that can identify a patient are Protected Health Information. Storing them on personal cloud accounts, texting them from a personal phone, or posting them without authorization creates real compliance risk—even when the intention is professional education or practice marketing.
Separate two permissions in your mind and on your forms: permission to capture and use photos for treatment and records, and permission to use photos in marketing, teaching, or job portfolios. Marketing consent should spell out channels (website, social media, print, presentations) and whether the face may appear.
- • Obtain written consent before any public or application use
- • Crop or withhold facial identifiers when consent does not cover them
- • Keep originals in secure storage with access controls and a BAA where required
- • Never rely on consumer camera-roll sync for patient images
- • Train staff so marketing posts pull only from the approved subset
For the compliance fundamentals, see what HIPAA compliance means for dental practices. For storage requirements and safer alternatives to consumer cloud, read HIPAA-compliant photo storage.
Tools That Make Portfolio Building Easier
You can build a portfolio with a camera, folders, and careful habits. Many dentists do. The friction shows up later: finding matching views during a consult, exporting a clean set for an interview, or confirming which cases have marketing consent.
Purpose-built dental photo tools reduce that friction by keeping before, during, and after images together as cases; tagging procedure type and views; and making presentation—including before-and-after comparison—part of the same system where photographs are stored. Generic cloud folders can retain files, but they rarely support chairside presentation, residency case assembly, or associateship application packages.
Esthetix is designed for that workflow: organizing clinical photographs into cases and presenting them clearly, whether you are building a practice gallery, residency documentation, or a professional portfolio. It does not replace clinical skill or photographic technique; it helps you retain and present the work you already produce.
Frequently Asked Questions
How many cases should a dental portfolio include?
Prioritize quality over volume. A focused set of 12–20 well-documented cases with consistent photography and clear outcomes is usually more effective than a large, uneven collection. Cover your primary treatment areas with a few strong examples each. Specialty residents should follow their program’s required case counts and presentation format first.
What is the AACD 12-view photographic series for a dental portfolio?
The American Academy of Cosmetic Dentistry (AACD) 12-view photo series is the gold standard for clinical case documentation. It consists of: (1) Full-face smile, (2) 1:2 Retracted frontal in maximum intercuspation, (3) 1:2 Retracted frontal with teeth separated, (4) 1:2 Retracted right lateral, (5) 1:2 Retracted left lateral, (6) 1:2 Maxillary occlusal arch mirror view, (7) 1:2 Mandibular occlusal arch mirror view, (8) 1:2 Right lateral smile, (9) 1:2 Left lateral smile, (10) 1:1 Retracted anterior close-up, (11) 1:10 Full-face at rest, and (12) 1:1 Occlusal contact/anterior guidance view.
How should I format a dental portfolio for associateship interviews?
Prepare a clean digital presentation (PDF dossier or tablet-friendly slide deck) structured around 5–10 comprehensive cases. Hiring principals prefer seeing a 60/40 mix: 60% high-quality everyday bread-and-butter restorative, endodontic, and crown/bridge cases that show daily chairside predictability, and 40% elective cosmetic or surgical cases showing aesthetic vision. Document step-by-step clinical execution (prep margins, rubber dam isolation, and occlusion verification) rather than only a polished glamour shot.
Can I use patient photos in a public dental portfolio?
Only with appropriate written consent covering marketing or professional use, and only after removing or withholding identifiers the patient has not authorized. Clinical photographs are protected health information under HIPAA, so originals should remain in secure storage while public or application materials use only consented, appropriately de-identified images. Residency presentations remain subject to both program policy and patient authorization, even when the audience is limited to faculty.
What do residency directors and associateship reviewers look for in a portfolio?
Reviewers look for diagnostic accuracy, consistent camera angles and lighting, rubber dam isolation, prep margin refinement, soft tissue respect, and verified occlusal clearance. They evaluate your clinical reasoning and ability to reflect on challenging steps—not just a filtered final photograph.
How should specialty residents organize clinical documentation for program completion?
Document each qualifying case as a structured record from the outset: diagnostic photographs, key intraoperative or laboratory stages, and final outcomes with matching views. Organize by procedure type, keep captions clinical, and maintain a single searchable archive so case presentations for program completion or board review can be assembled without reconstructing records at the end of training.
Organize Cases Once, Present Them Everywhere
Esthetix helps you keep before-and-after cases together, retrieve the right examples during consultations, and prepare a clear portfolio for patient communication, residency presentations, or associateship applications.
Get started and be up and running in minutes.